
ROMC Info
This page aims at overcoming eventual difficulties that potential ROMC participants may experience.
The RAMI Online Model Checker (ROMC) allows owners, users and developers of Radiative Transfer (RT) models to obtain an indication regarding the performance of their model. As its name suggests the ROMC is closely linked to the RAdiative transfer Model Intercomparison (RAMI) exercise, and - similar to RAMI - the participation in the ROMC evaluation exercise is also voluntary, free of charge, but subject to adherence to the ROMC privacy and data usage policy).
To assess the performance of RT models in FORWARD mode the ROMC provides a series of test cases that can be subdivided into a structurally HOMOGENEOUS set, where the spatial distribution of scatterers is the same throughout the scene, and a structurally HETEROGENEOUS set, where the spatial distribution of the scatterers is dependent on the actual location within a scene. Regardless of the structure of the selected test cases the ROMC allows for RT models to be evaluated either in DEBUG or in VALIDATE mode.
In DEBUG mode, the user may choose himself the number and types of both experiments and measurement which are identical to those already featured during previous phases of RAMI such that the results are known.
In VALIDATE mode, the user will be presented with test cases that are slightly different from those featured in previous phases of RAMI such that the results will not be known a priori.
Interested ROMC users are invited to register their models and to implement the test cases that are presented to them. Once they have performed the required model simulations they may submit their results on-line. These data will then be checked against the ROMC formatting and file-naming convention (identical to those of the RAMI exercise see below) i and then compared against a reference set of BRF data. The reference set itself is generated from an ensemble of 3-D RT models that have been identified as `most appropriate' during the 3rd RAMI phase.
Whereas the RAMI exercise aims at the intercomparison of models across large sets of different structural, spectral and illumination conditions, the ROMC provides an indication of the performance of RT models using only a small ensemble of test cases. However, the ROMC is an on-line checking tool thereby allowing modelers, developers and users of RT models to constantly verify the performance of their models, whereas new phases of RAMI are only conducted at intervals of 2-3 years.
To use the ROMC users have to register: use the The European Commission's main authentication (ECAS) service.
Go to ECAS: create an account webpage to create a new account and enter all information needed. At the end click on "Create an account" button.
You should receive an e-mail allowing you to confirm the registration: follow instructions to complete the registration process. You are now registered to ECAS authentication website.
Consult the help for external users here.
Go to ECAS authentication website and open the EU Login - Sign in page:
Once you have entered the ROMC you may use the various menus on the left-hand navigation menu to move within the ROMC.
ROMC Info contains links to measurements definitions, results formatting and file naming conventions, as well as this FAQ page.
My models allows you to register a new model (this is the first step toward checking your model's performance), view your models' performances, as well as to 'compare' different runs of your model, or to view the entire list of models that have been evaluated using ROMC.
The Logout button will exit you from the ROMC. To evaluate your RT model, you should thus first register your model using the 'My Models > Register a new model' link. Once you have done this you will be automatically taken to the 'My Models > My model performances' page where a four-column table with your model name as header-line will be presented to you. Here, in the third column, you may indicate both the "ROMC usage" type (DEBUG or VALIDATE) and then also the "canopy structure" type in order to specify the way in which ROMC will evaluate your model, as well as, the dimensionality of the test cases used to do so (homogeneous versus heterogeneous vegetation canopies), respectively. The "ROMC usage" called DEBUG mode, enables a user to choose him/herself the number and types of both experiments and measurement which, in turn, are identical to those that featured in previous phases of RAMI: In other words in DEBUG mode the results of the simulations are already publicly known/published. In VALIDATE mode, on the other hand, a user will be presented with a small set of test cases that are slightly different from those featuring in previous phases of RAMI such that the model simulation results will not be known a priori. Note that the selection of test cases provided by VALIDATE mode cannot be changed. For more info see the next FAQ.
The first step to check the performance of your RT model is to register it.
This can be done by selecting the 'Register a new Model' link from the My Models menu in the left-hand navigation menu. To register a new model it needs to be given a model name and (optionally) a small description regarding its type and internal functioning, e.g., Analytic plane-parallel canopy reflectance model with hot spot formulation and Bunnik's Leaf normal distribution function.' You may also provide a published reference to your model if it exists. Note that model names are case-sensitive alphanumeric strings of maximum 10 characters that have to be unique within the context of the ROMC. Avoid using characters like \ / : ' * ? " < > | _ - or blanks in your model name. Because model names are case-sensitive, this means that the model identifier that is included in the filenames of your simulation results therefore must be exactly the same as the one defined when first registering that model in ROMC. A complete list of currently registered models can be found by clicking on the 'model list' button in the My models menu. Note also that the number of models per user is limited to 3. When you have entered all information into the boxes of the model registration page click the 'submit' button to proceed. This will automatically forward you to the model evaluation page.
The model evaluation page can also be accesses via the 'My model performances' link on the My Models menu. Assuming that you have just registered your first model this page will show you a table with four columns and one header line. The link in the header line is your model name; clicking it will allow you to alter the description of your model. The left hand (or first) of the columns in the table will give you the status of the test, i.e., NEW in the case where you just registered this model. The second (from the left) column will indicate the date of starting this particular evaluation check of your model (since you have not started anything yet is will say < not activated yet >). The third column offers you several choices on how to run the ROMC and on what kinds of vegetation canopies.
The first choice a user has to make is to selected between two different types of "ROMC usage":

If a user chooses to select VALIDATE mode the ROMC will automatically (and randomly) assign a series of HOMogeneous and/or HETereogeneous test cases to your model. This selection of test cases cannot be changed, unless users submit their results files, in which case a new set of test cases will be automatically (and randomly) selected for the user. Obviously the reference dataset will not be available for download in VALIDATE mode, but the ROMC results do qualify as a means to show the performance of a users model in eventual publications.
The next choice a user has to make is to selected between different types of "canopy structures":
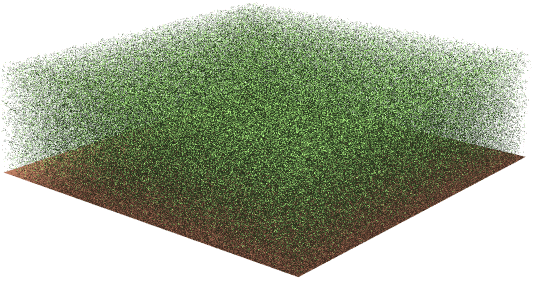
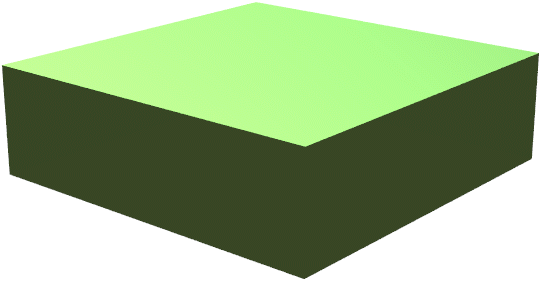
HOM refers to structurally homogeneous canopy scenarios.
These test cases may come with

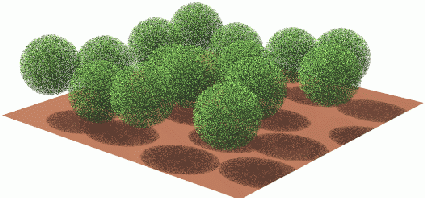
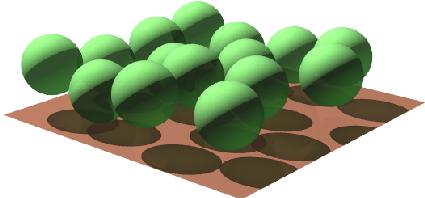
HET refers to structurally heterogeneous canopy scenarios, like the floating spheres test cases these may come with
HOM HET refers to test cases that may be either structurally homogeneous or heterogeneous.
Once you have selected you model evaluation preferences, click on the View test cases button in the right-most column of the table and you will be presented with a (two column) table showing the proposed/assigned experiments (left column) and measurements (right column). Each of the measurements and experiments identifiers in this table can be clicked upon to receive a pop-up window with a detailed description of the structural, spectral and illumination setup of the experiment, or, of the exact measurement conditions as well as the formatting requirements for the results.
Whether you chose DEBUG or VALIDATE mode, homogeneous or heterogeneous canopy structures (or both): Once you have accepted your selected/assigned test scenes, the ROMC returns you to the "My model > My model performance" page which has changed to indicate:
To have access to another set of test cases for this model you will first have to submit the results of your simulations using the SUBMIT Results link (located in the rightmost column).
Assuming, for now, that now you have implemented all selected/assigned test scenes as required (you can always go to their descriptions using the VIEW Test Scenes link in the right hand column of the table) and that you did run your model in accordance with the various ROMC simulation definitions to yield results files that are in line with the ROMC file-naming and formatting rules (you can always check whether your output files are compliant with ROMC by using the Check Format link in the rightmost column of the table), then you can proceed to submit these results by clicking on the SUBMIT Results link located in the rightmost column of the table in the model performance page. To do so you may either submit one single archive file (accepted formats are: .tar, .zip, .tgz with the compressions .gz, .bz2, .Z, .tgz), or else-by clicking on the 'Multiple ASCII Files' box to submit individual results files (uncompressed) one by one (this option is only visible if you don't upload more than 44 files) . In both cases you may use the 'browse' button to locate the files that you wish to transfer. When you press the 'send' button we will collect the files, perform a variety of security and formatting test. If you did not implement the correct file-naming scheme - or you did not submit all required measurements files - a 'SUBMISSION ERROR' page will appear. You will have to repeat the submission process - selecting at least one measurement (the same one) per experiment for the submission to work. If the right amount of results files with correct file-naming schemes have been submitted, then the formatting of the content of these files will also be analyzed. If there are any deviations from the ROMC formatting convention (in particular the view zenith and azimuth nomenclature) then this will also give rise to a 'SUBMISSION ERROR' page where the error is explained so that you may fix it.
If your submission is successful, i.e., all filenames and content formatting is correct and the right number of files was transferred, then you will be informed so via the temporary 'SUBMISSION SUCCESSFUL' page, that will automatically forward you to the initial 'My models > My model performance' page again. Here now the SUBMIT Results link in the rightmost column of the model table has been replaced by a VIEW Results link, and the submission time has also been added to the second column of the table. The first column now reads 'Current test (completed)' and a new row (with the NEW label in the first column) has been inserted in the model table, where you may select the next test conditions for evaluating the performance of your model if you wish. Should you, however, decide to click onto the VIEW Results link you will be presented with the Results page containing a table whose blue and orange colored fields provide links to measurement, experiment and statistical description pages. The various links in the white table fields provide access to various graphical presentations of the agreement between your uploaded results and the reference dataset.
You may either save these graphical results files (that feature the ROMC watermark and a reference number) as jpeg files directly from your browser, or else, choose to receive them via email, as black&white or colour encapsulated postscript files (.eps) by selecting one or more measurements and statistics (individually, or, via the rows or ALL boxes).
The authors/developers of the participating RT models maintain full rights on their models. In fact, participation in the ROMC activity does not assume, imply or require any transfer of ownership, intellectual property, commercial rights or software codes between the participants and the ROMC coordinators.
Registered participants do deliver to the ROMC the results of computations (typically, suitably formatted tables of numbers representing reflectances and other properties of the simulated radiation field), obtained with their own models, for the explicit purpose of comparing them with similarly derived results from a set of 3-D RT models that were identified during previous phases of the RAdiative transfer Intercomparison (RAMI) initiative. These results become the property of the ROMC coordination group, but the latter, in turn, offer the qualified participant the right to use, distribute and to publish the ROMC results pertaining to his/her model (GIF and EPS formats) provided that they are not changed or modified in any way. The ROMC coordinators encourage the publication of VALIDATE mode results and retain the right of interfering if ROMC users try to accredit their models by changing or modifiying ROMC results.
Furthermore, since the ROMC's DEBUG mode features identical test cases as those that were made publicly available at the end of the third phase of RAMI it should be apparent that DEBUG mode results do not qualify as model validation! Users of the ROMC are therefore advised not to use DEBUG mode results to make public claims regarding the performances of a model. By contrast, results obtained in VALIDATE mode, however, do qualify as a means to document the performance of a given RT model and consequently may be used in publications for that purpose. In fact, one of the goals of the ROMC is precisely to establish a mechanism allowing users, developers and owners of RT models to make the quality of their RT models known to the larger scientific community. By using results obtained from a series of 3D Monte Carlo models, identified during the RAMI community exercise, in order to generate a surrogate truth the ROMC provides an independent and speedy mechanism to evaluate the performance of RT models (in absence of other absolute reference standards). The ROMC thus encourages the usage of the provided VALIDATE mode results graphs in publications.
Please note, that it is not permissible to modify, change or edit the results provided by the ROMC. This applies to ROMC graphs, statistics, and reference data which must all be used 'as is'. If you choose to include ROMC results in a publication or presentation their source should be acknowledged as follows:
These results were obtained with the RAMI On-line Model Checker (ROMC) available at https://romc.jrc.ec.europa.eu/, [Widlowski et al., 2007]:
Prior to publication the registered ROMC user is encouraged to contact the ROMC coordinators (contact ec(dash)romc(dash)webadmin(at)ec(dot)europa(dot)eu) to ensure the correctness of the received ROMC results plots. Although the ROMC procedure aims at eliminating errors and inconsistencies, no guarantees as to the correctness of the automatically displayed results can be given (in particular if models are tested with functionalities that lie outside the scope of RAMI, e.g., they generate specular peaks, etc.). The responsibility for verifying ROMC results prior to any publication thus lies with the registered ROMC user, and neither the ROMC coordinators nor their institution accept any responsibility for consequences arising from the publication of unverified ROMC results.
Submitted results are not returned to their originators, they are kept for verification purposes or in case of conflicts arising from unjustified model performance claims. By submitting simulation results to the ROMC coordinators, registered ROMC users authorize the ROMC to analyze these results and compare them to a set of reference data (derived from 3-D Monte Carlo models participating in previous phases of RAMI). The ROMC coordinators will not distribute the outcome of such analysis without the explicit consent of the registered ROMC users in question. Furthermore, the ROMC coordinators will never disclose to anybody (including other registered ROMC users), for any reason, neither the data nor the ROMC results obtained by a registered ROMC user. The sole exception to this is if there are substantiated doubts in the ways by which a registered ROMC user has produced claims to his/her model performance in the scientific literature or in public on the basis of results originating apparently form the ROMC.
For practical reasons, the copyrights on the ROMC web site, including the text, figures, tables and other graphical, textual or programming elements remains with the ROMC coordinators. Within the legal limits allowed by copyright laws, figures, tables, statistics and other materials published on the ROMC web site can be downloaded and used in other works, provided full and explicit reference to the source materials are duly provided (see above).
The ROMC coordinators do not take any responsibility for the scientific value or suitability for any particular purpose of the model results submitted in this context.
They do however make every effort to ensure the appropriateness, accuracy and fairness of these benchmarks, and provide advice or support to the registered ROMC users as and when needed. Should you find obvious errors and shortcoming, please do not hesitate in communicating these to us such that we may improve this service to other users. Just send an email.
Here, you can contact ec(dash)romc(dash)webadmin(at)ec(dot)europa(dot)eu ROMC coordinators.
According to the ROMC data usage policy all results submitted to the ROMC become the property of the ROMC coordination group, but the latter, in turn, offer the registered user the right to use, distribute and (preferably in VALIDATE mode only) to publish the ROMC results pertaining to his/her model (GIF and EPS formats) provided that they are not changed or modified in any way. The ROMC coordinators retain the right of interfering if ROMC users try to accredit their models by changing or modifiying ROMC results.
Furthermore, since the ROMC's DEBUG mode features identical test cases as those that were made publicly available at the end of the third phase of RAMI it should be apparent that DEBUG mode results do not qualify as model validation! Users of the ROMC are therefore advised not to use DEBUG mode results to make public claims regarding the performances of a model. By contrast, results obtained in VALIDATE mode, however, do qualify as a means to document the performance of a given RT model and consequently may be used in publications for that purpose. In fact one of the goals of the ROMC is precisely to establish a mechanism allowing users, developers and owners of RT models to make the quality of their RT models known to the larger scientific community. By using results obtained from a series of 3D Monte Carlo models, identified during the RAMI community exercise, in order to generate a surrogate truth the ROMC provides an independent and speedy mechanism to evaluate the performance of RT models (in absence of other absolute reference standards). The ROMC thus encourages the usage of the provided VALIDATE mode results graphs in publications.
Please note, that it is not permissible to modify, change or edit the results provided by the ROMC.
This applies to ROMC graphs, statistics, and reference data which must all be used 'as is'. If you choose to include ROMC results in a publication or presentation their source should be acknowledged as follows:
These results were obtained with the RAMI On-line Model Checker (ROMC) available at https://romc.jrc.ec.europa.eu/, [Widlowski et al., 2007]:
Prior to publication the registered ROMC user is encouraged to contact the ROMC coordinators (contact ec(dash)romc(dash)webadmin(at)ec(dot)europa(dot)eu) to ensure the correctness of the received ROMC results plots. Although the ROMC procedure aims at eliminating errors and inconsistencies, no guarantees as to the correctness of the automatically displayed results can be given (in particular if models are tested with functionalities that lie outside the scope of RAMI, e.g., they generate specular peaks, etc.).
The responsibility for verifying ROMC results prior to any publication thus lies with the registered ROMC user, and neither the ROMC coordinators nor their institution accept any responsibility for consequences arising from the publication of unverified ROMC results.
© European Union, 2007 - 2025
The Commission’s reuse policy is implemented by Commission Decision 2011/833/EU of 12 December 2011 on the reuse of Commission documents (OJ L 330, 14.12.2011, p. 39 – https://eur-lex.europa.eu/eli/dec/2011/833/oj). Unless otherwise noted, the reuse of this document is authorised under the Creative Commons Attribution 4.0 International (CC BY 4.0) licence (https://creativecommons.org/licenses/by/4.0/). This means that reuse is allowed, provided that appropriate credit is given and any changes are indicated.
One of the drawbacks of RT model evaluations is the absence of some absolute reference standard, or, truth.
If this happens then it may well be that you have already registered three other models. Currently the maximum number of models per user is limited to 3. If you wish to register additional models please send an email to the ROMC administrator using the following contact ec(dash)romc(dash)webadmin(at)ec(dot)europa(dot)eu.
Alternatively, if you receive the message 'Model name exists already!' when trying to register a new model this means that someone else has chosen to register that case-sensitive alphanumeric string within ROMC. Your only option at that stage is to find another model name, for example, by capitalizing some letters, or by adding your initials (a year date, or, version number) at the end of the model name. Example if 'Modtran' exists already try 'MODTRAN', 'modtranJS' or 'modtran2'. To facilitate the selection of model names, note that model names are case-sensitive alphanumeric strings of maximum 10 characters that have to be unique within the context of the ROMC. Avoid using characters like \ / : ' * ? " < > | _ - or blanks in your model name. Because model names are case-sensitive, this means that the model identifier that is included in the filenames of your simulation results therefore must be exactly the same as the one defined when first registering that model in ROMC. A complete list of currently registered models can be found by clicking on the 'model list' button in the My models menu.
The participation with multiple models is permissible up to a number of three. If you wish to register more than 3 models you must contact the ROMC coordinators using the following contact ec(dash)romc(dash)webadmin(at)ec(dot)europa(dot)eu. Note that model names are case-sensitive alphanumeric strings of maximum 10 characters that have to be unique within the context of the ROMC. Avoid using characters like \ / : ' * ? " < > | _ - or blanks in your model name. Because model names are case-sensitive, this means that the model identifier that is included in the filenames of your simulation results therefore must be exactly the same as the one defined when first registering that model in ROMC.
Yes.
During the registration process of your model you may be rather descriptive in terms of outlining the functioning as well as selected applications of your model. You may provide references and a contact address. Even after registering a new model it is always possible to click on a models name (on the 'My models > My models performance' page accessible from the menu in the left-hand navigation menu) to edit the current model description.
If you receive the message 'Model name exists already!' when trying to register a new model this means that someone else has chosen to register that case-sensitive alphanumeric string within ROMC. Your only option at that stage is to find another model name, for example, by capitalizing some letters, or by adding your initials (a year date, or, version number) at the end of the model name. Example if 'Modtran' exists already try 'MODTRAN', 'modtranJS' or 'modtran2'. To facilitate the selection of model names, note that model names are case-sensitive alphanumeric strings of maximum 10 characters that have to be unique within the context of the ROMC. Avoid using characters like \ / : ' * ? " < > | _ - or blanks in your model name. Because model names are case-sensitive, this means that the model identifier that is included in the filenames of your simulation results therefore must be exactly the same as the one defined when first registering that model in ROMC. A complete list of currently registered models can be found by clicking on the 'model list' button in the My models menu. Note also that the number of models per user is limited to 3.
No.
When submitting individual results files they will have to be text files (ASCII). If you choose to submit one single archive file (whether compressed or not) it must contain ASCII results files. The ROMC will reject all other file formats apart form plain text. Please ensure - prior to submission - that your results files adhere to the file naming and formatting convention. Similarly, results files (.mes) themselves should not be compressed.
Yes.
The file-naming convention is mandatory since it allows the automatic processing of the submitted results. Filenames that do not adhere to the prescribed file naming convention will result in the ROMC processing to be aborted. Thus, prior to the sending of any results, you are strongly encouraged to perform an on-line format check using the Check Format on the 'My Models > My model performances' page, to see if your model has produced correctly named and formatted result-files. Note that because model names are case-sensitive, this means that the model identifier that is included in the filenames of your simulation results therefore must be exactly the same as the one defined when first registering that model in ROMC.
All submitted simulation files must be of type ASCII (plain text). Detailed information as to the precise formatting (header line, columns and rows) of the results files can be found here. You may also consult the measurements definition pages directly for examples of results files. Of particular importance here are the angular sign conventions. Adherence to these format conventions is mandatory since otherwise the ROMC will reject the submitted files.
The short answer to this question is: all that you select. However, the ROMC will only complain about missing experiments in VALIDATE mode. In DEBUG mode it is you that chooses the number of experiments, and even if you do not submit all of them, the ROMC will continue. In VALIDATE mode, on the other hand, the number of experiments is prescribed (usually four) and the ROMC will make sure that you submit each one of them. Therefore, make sure that, when you are selecting your model evaluation options in VALIDATE mode, you choose a "canopy structure" type that is actually feasible with your model at hand: Currently you may choose amid
Also, please make sure that you adhere to the ROMC simulation definitions and ROMC formatting convention.
Again, the answer to this question is: all of those that your model is capable of simulating. If there are some RAMI experiments that you are unable to perform (in VALIDATE mode for example) never mind. Whatever measurements you choose to submit in VALIDATE mode must, however, be submitted for all selected experiments though. In DEBUG mode you may submit whatever combination of experiments and measurements you wish.
Please make sure that you utilize the proper ROMC definitions regarding angular sign conventions, leaf normal distributions, and other RT model technicalities prior to starting your simulations. Also read the relevant file naming and formatting conventions that must be adhered to by all participants.
Canopy reflectance models are developed to simulate the reflectance fields of existing types of vegetation architecture. The choice of representations of such vegetation canopies is primarily related to the dimensionality of the RT model, but also to the computational constraints at the time of its conception, as well as the potential field(s) of application. Particularly for the panoply of existing 3-D RT models the scene representation strategies may vary widely. Beyond the actual performance of a particular model it is thus of interest to determine what the actual limits and strengths of these different scene implementations within RT models are. Hence for any RT model that is using the ROMC to evaluate itself, the goal should be to represent the prescribed geophysical environments to the best of its abilities. This means that within the constraints provided by the canopy formulation of that model, the structural properties of a given scene should be described as faithfully as possible to the original description (provided on the corresponding HTML pages). For some sophisticated models this may mean to use (in DEBUG mode) the (optional) ASCII files that we provide to reproduce exactly the location and orientation of all individual scatterers in the scene. Other models, may do well by generating their scenes in a manner that is suitable for their own internal formalism, provided that structural parameters like canopy height, leaf area index, leaf area density, etc. are respected at least at the level of the scene if not at the level of every individual object. For best simulation results try also to adhere as close as possible to the ROMC simulation definitions.
ROMC Participants are strongly encouraged to simulate all prescribed measurements within the capabilities of their model. In DEBUG mode you may submit any combination of experiments and measurements. In VALIDATE mode, however, the ROMC is strict in enforcing that whatever the measurement type chosen it is submitted for all of the presented experiments (typically 4). Thus it is possible to only select the brfop measurement type, for example, and to submit four files only ( 1 per experiment), or, alternatively to select all 11 measurement types and submit 4*11=44 results files to the ROMC (in VALIDATE mode).
The first step to check the performance of your RT model is to register it. This can be done by selecting the 'Register a new Model' link from the My Models menu in the left-hand navigation menu. To register a new model it needs to be given a model name and (optionally) a small description regarding its type and internal functioning, e.g., Analytic plane-parallel canopy reflectance model with hot spot formulation and Bunnik's Leaf normal distribution function.' You may also provide a published reference to your model if it exists. Note that model names are case-sensitive alphanumeric strings of maximum 10 characters that have to be unique within the context of the ROMC. Avoid using characters like \ / : ' * ? " < > | _ - or blanks in your model name. Because model names are case-sensitive, this means that the model identifier that is included in the filenames of your simulation results therefore must be exactly the same as the one defined when first registering that model in ROMC. A complete list of currently registered models can be found by clicking on the 'model list' button in the My models menu. Note also that the number of models per user is limited to 3. When you have entered all information into the boxes of the model registration page click the 'submit' button to proceed. This will automatically forward you to the model evaluation page.
The model evaluation page can also be accesses via the 'My model performances' link on the My Models menu in the left-hand navigation menu. Assuming that you have just registered your first model this page will show you a table with four columns and one header line. The link in the header line is your model name; clicking it will allow you to alter the description of your model. The left hand (or first) of the columns in the table will give you the status of the test, i.e., NEW in the case where you just registered this model. The second (from the left) column will indicate the date of starting this particular evaluation check of your model (since you have not started anything yet is will say < not activated yet >). The third column offers you several choices on how to run the ROMC and on what kinds of vegetation canopies.
The first choice a user has to make is to selected between two different types of "ROMC usage":


The next choice a user has to make is to selected between different types of "canopy structures":


Once you have selected you model evaluation preferences, click on the View test cases link in the right-most column of the table and you will be presented with a (two column) table showing the proposed/assigned experiments (left column) and measurements (right column). Each of the measurements and experiments identifiers in this table can be clicked upon to receive a pop-up window with a detailed description of the structural, spectral and illumination setup of the experiment, or, of the exact measurement conditions as well as the formatting requirements for the results.
Whether you chose DEBUG or VALIDATE mode, homogeneous or heterogeneous canopy structures (or both): Once you have accepted your selected/assigned test scenes, the ROMC returns you to the "My model > My model performance" page which has changed to indicate:
To have access to another set of test cases for this model you will first have to submit the results of your simulations using the SUBMIT Results link (located in the rightmost column).
Assuming, for now, that now you have implemented all selected/assigned test scenes as required (you can always go to their descriptions using the VIEW Test Scenes link in the right hand column of the table) and that you did run your model in accordance with the various ROMC simulation definitions to yield results files that are in line with the ROMC file-naming and formatting rules (you can always check whether your output files are compliant with ROMC by using the Check Format link in the rightmost column of the table), then you can proceed to submit these results by clicking on the SUBMIT Results link located in the rightmost column of the table in the model performance page. To do so you may either submit one single archive file (accepted formats are: .tar, .zip, .tgz with the compressions .gz, .bz2, .Z, .tgz), or else-by clicking on the 'Multiple ASCII Files' box to submit individual results files (uncompressed) one by one (this option is only visible if you don't upload more than 44 files) . In both cases you may use the 'browse' button to locate the files that you wish to transfer. When you press the 'send' button we will collect the files, perform a variety of security and formatting test. If you did not implement the correct file-naming scheme - or you did not submit all required measurements files - a 'SUBMISSION ERROR' page will appear. You will have to repeat the submission process - selecting at least one measurement (the same one) per experiment for the submission to work. If the right amount of results files with correct file-naming schemes have been submitted, then the formatting of the content of these files will also be analyzed. If there are any deviations from the ROMC formatting convention (in particular the view zenith and azimuth nomenclature) then this will also give rise to a 'SUBMISSION ERROR' page where the error is explained so that you may fix it.
If your submission is successful, i.e., all filenames and content formatting is correct and the right number of files was transferred, then you will be informed so via the temporary 'SUBMISSION SUCCESSFUL' page, that will automatically forward you to the initial 'My models > My model performance' page again. Here now the SUBMIT Results link in the rightmost column of the model table has been replaced by a VIEW Results link, and the submission time has also been added to the second column of the table. The first column now reads Old test and a new row has been inserted in the model table, where you may select the next test conditions for evaluating the performance of your model if you wish. Should you, however, decide to click onto the VIEW Results link you will be presented with the Results page containing a table whose blue and orange colored fields provide links to measurement, experiment and statistical description pages. The various links in the white table fields provide access to various graphical presentations of the agreement between your uploaded results and the reference dataset.
You may either save these graphical results files (that feature the ROMC watermark and a reference number) as jpeg files directly from your browser, or else, choose to receive them via email, as black&white or colour encapsulated postscript files (.eps) by selecting one or more measurements and statistics (individually, or, via the rows or ALL boxes). Note, however that a maximum of 5 emails with about 1.5 Mbytes each will only be send at any one time (so make use of the size information provided in the rightmost column and bottom row when selecting your results). In DEBUG mode you may also receive the reference data in text form (ASCII). Once you have made your choice click on the 'receive' button to obtain (one or more) emails (sorted per type, i.e., eps, ASCII). Alternatively use the 'Back' button to return to the 'My Models > My Model Performance' page again. You are free to use these results as long as you comply with the ROMC data usage policy.
When submitting your results in a single archive file this file has to be generated using the codes: ZIP, TAR and TGZ. If furthermore you wish to compress this archive you may use the softwares GZIP, BZIP2 and COMPRESS. Note that it is possible to include directories within the archive file, however, your model submission (.mes) files must be uncompressed ASCII files. The table below provides you with an overview of accepted combinations of archive and compression softwares (the name of the archive here is archive.*).
| Code to generate archive file | Code to compress archive file without compression |
|---|---|
| ZIP | zip archive.zip *.mes |
| TAR | tar c *.mes -f archive.tar |
| TGZ | tar c *.mes -fz archive.tgz |
Note that if the size of the archive that you try to upload is larger than about two megabytes, a pop-up window will appear stating that the file contains no data.
This may happen, for example, if you try to upload all DEBUG mode results at once, in particular, when using the uncompressed tar archive option. In this case we suggest you to compress the archive to resend it. Even a gzipped tar archive of all HOM and HET DEBUG mode experiments (and all measurements) should, however, not exceed the 2 Mb limit.
If you believe to have adhered to all these rules but are still unable to upload your data, please send an email to the ROMC coordinators (attaching the archive file - if it is not bigger than 2Mb) and explain the problem.
The ROMC results page - accessible via the VIEW Results link on the 'My Models > My model performances' page - provides access to your model simulation results via the various links in the white fields of the results table. All but the last row in the (white section of that) table provide access to model results that pertain to a single experiment only. The last (white) row of the results table, on the other hand, provides graphs giving a synoptic overview of the model performance over all experiments. The columns of the results table relate to individual measurements (brfpp, brfop, ftran, fabs, etc) as well as the Χ2 statistics (which is described in greater detail here). In addition to the Χ2 statistics there are four different types of graphs available that describe the performance of the model tested:
the root mean square (RMS) error:

and the signal-to-noise ratio (SNR):
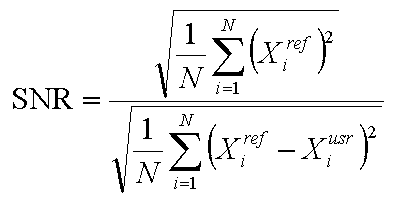
the root mean square (RMS) error:

Examples of individual ROMC plot types for DEBUG mode
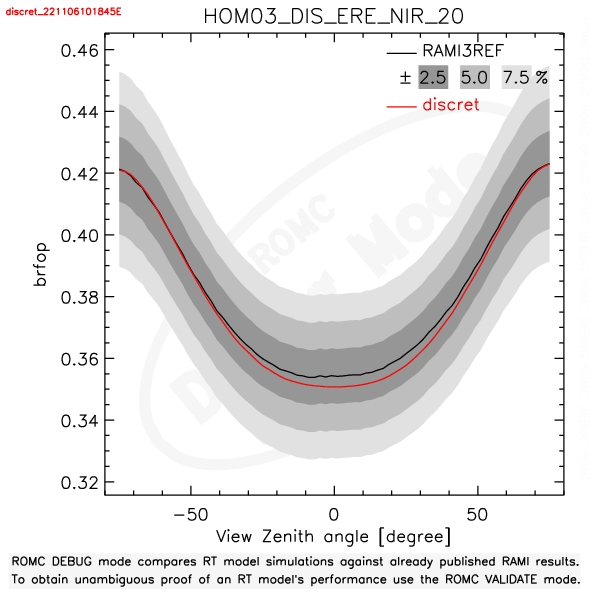
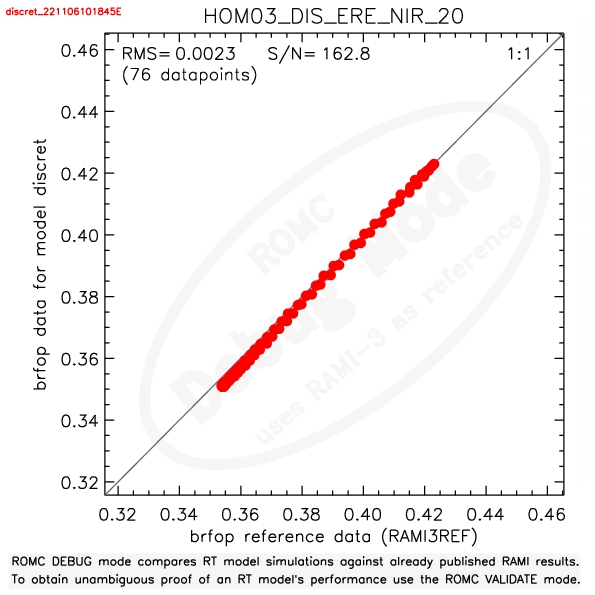
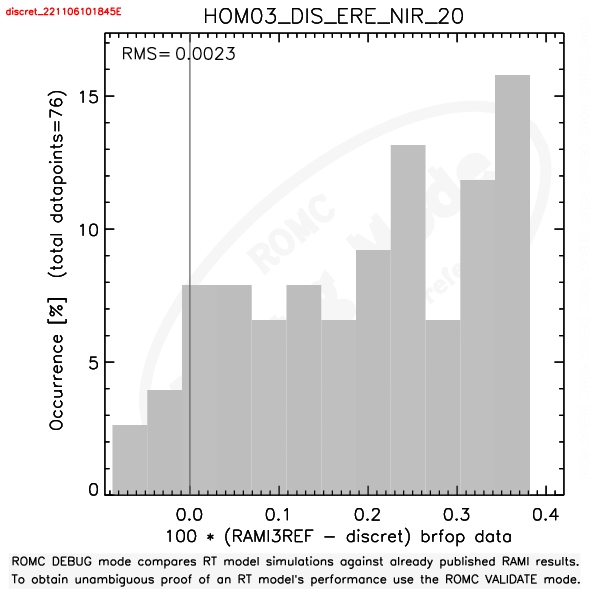
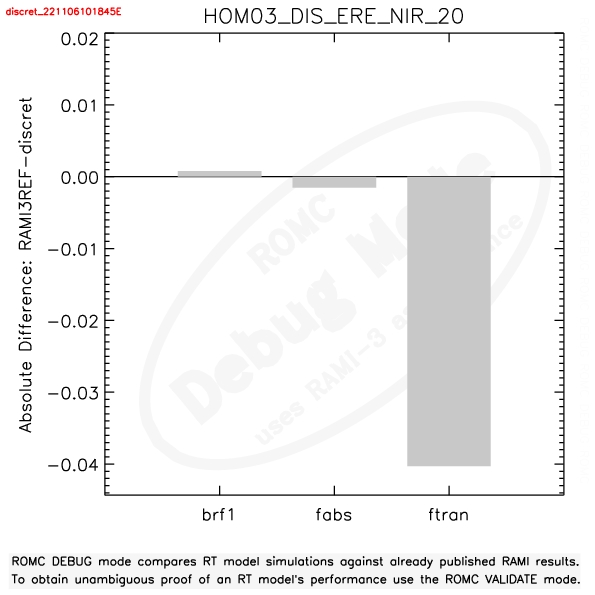
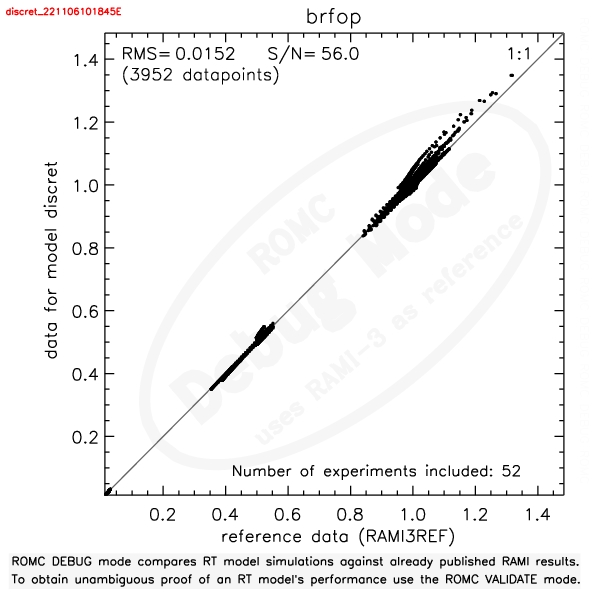
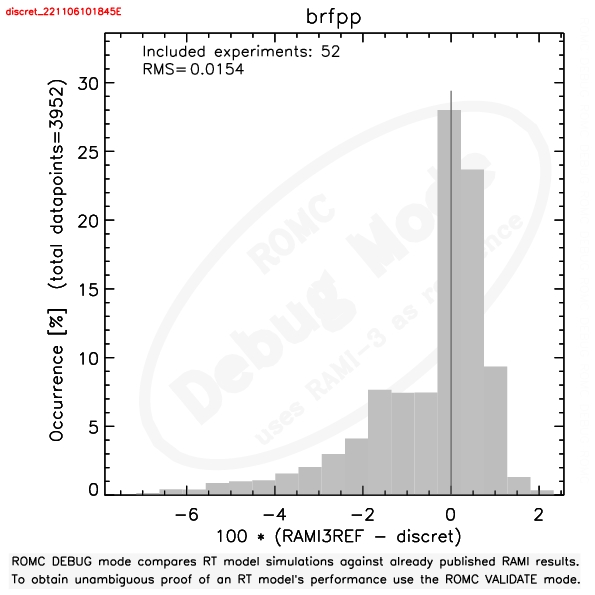
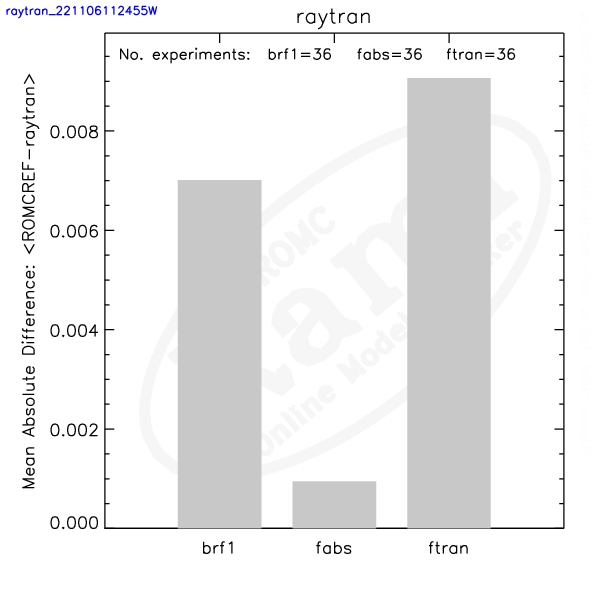
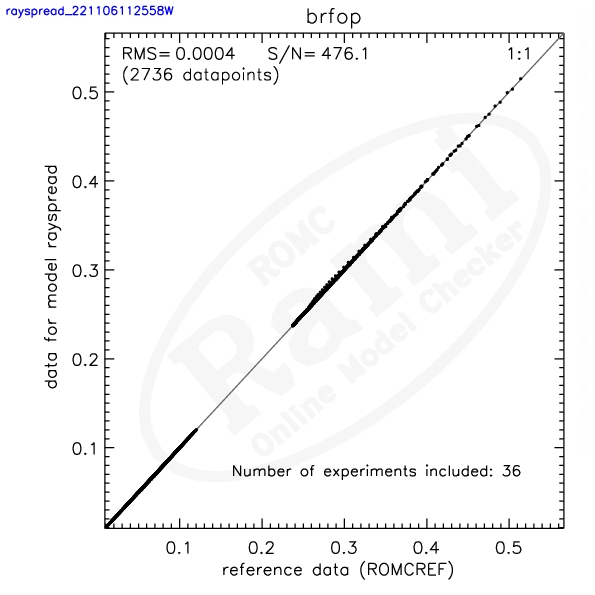
The various ROMC graphs with your results appear as pop-up windows if you click on the corresponding links in the table of the ROMC results page. It may well be that you have disabled pop-up windows for your browser. If that happens you can usually see a bar appearing at the upper part of your browser's main window. Follow the instructions there to allow pop-up windows for the ROMC site.
The Taylor diagram provides a concise statistical summary of how well patterns match each other in terms of their correlation, their root-mean-square difference, and the ratio of their variances (Karl. E. Taylor, 'Summarizing multiple aspects of model performance in a single diagram', Journal of Geophysical Research, Vol 106, No. D7, pages 7183-7192, April 2006). Despite their advantages one should bear in mind that Taylor diagrams do not allow to differentiate between two datasets that differ only by a constant offset. We remedy this somewhat by varying the size of the plotting symbols in the Taylor diagrams, but only if no negative correlations occured, and, the absolute difference between the model and reference mean differs by more than 3 percent from the mean of the reference data. Nevertheless, it is recommended to cross-check model performance with the skill value of a given model.
In essence it is based on the relationship between three commonly used statistical measures:


The total RMS can be separated into the quadratic sum of a contribution due to the 'overall bias' and another due to the 'centered pattern RMS difference':


The pattern of RMS differences approaches zero as two patterns become more alike, but for any given value of RMS* it is impossible to determine how much of the error is due to a difference in structure and phase and how much is simply due to a difference in amplitude of the variations.

It can be shown that the RMS difference is related to the correlation coefficient, and the standard deviations of both the user and reference datasets in a similar manner as is expressed by the law of cosines for the relationship between two adjacent sides of a triangle together with the angle between them, and the third (opposite) side of the triangle:

This allows to construct a a diagram that statistically quantifies the degree of similarity between two fields. In our case, one of the fields will be ROMC reference dataset, and the other the dataset generated by a user's model. The aim is to quantify how closely the user's dataset resembles the ROMC reference dataset. In the figure below several points are plotted on a polar style graph with the black lozange (plotted along the abscissa) representing the reference solution and the circles representing the user's results for different measurement types (colour coding). The radial distances from the origin to the points (dotted circular arcs) are proportional to the normalised standard deviation (that is the ratio of the standard deviation of the users data to that of the reference data). As a consequence the black lozange (ROMC reference) is at a distance of 1 from the origin. The azimuthal position of the datapoints in the graph gives the correlation coefficient, R between a dataset and the ROMC reference data (labels of correlation coefficient are given along the outer circular rim of the graph). One can see that the azimuthal distance of the ROMC reference data (black lozange) corresponds to a perfect correlation (R=1). The dashed lines measure the distance from the reference data and correspond to the RMS difference between two datasets (once any overall bias has been removed). In the figure below one can see that the red dot features a larger variance than the reference solution (radial distance from origin is larger). Its correlation with the reference solution (black lozange) is higher than that of the blue and mauve points, which in turn, exhibit a smaller variance than the reference dataset (smaller radial distance to origin). The RMS difference (dashed circular rings) is very similar for all three points with the mauve one having the smallest value of RMS*.
In order to generate a graph with the skill values of one or more of your ROMC submissions you will have to click on the 'My models > Model Skill' link in the left hand side navigation panel. This will bring you to the first of two pages required before ROMC will generate the skill graphs you want:
The result is a graph showing model skill (on a logarithmic y axis) - where skill=100 is perfect match and skill=0 is worst case scenario - for each of the measurements you selected. If you chose different ROMC submissions from the same model then a legend graph will be shown that relates the model colour to the actual submission time at which that ROMC submission was performed.
The size of the plotting symbols is related to the number of experiments performed for any given ROMC submission. All graphs can be received in postscript form by selecting the graphs of interest and clicking on the 'send' button at the bottom of the page.
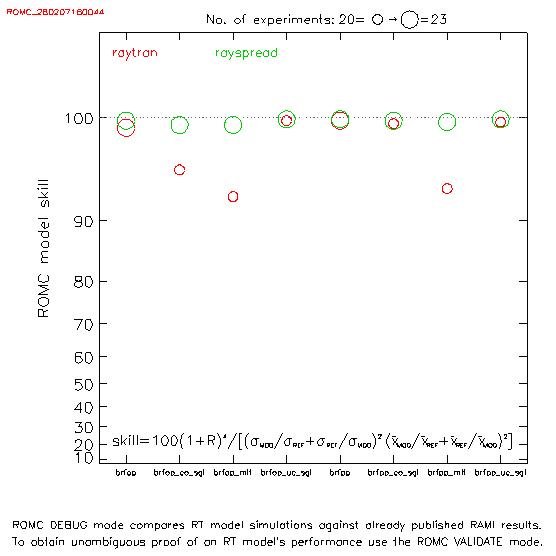
If you have submitted a large ensemble of test cases, say DEBUG HOMOGENEOUS canopies in both the NIR and red spectral domain, you will have been presented with a series of graphs - in the 'All experiment' column of the resulting results table - that feature the contribution from all selected experiments and measurements. Assume that you would now want to have such a summarising graph but only for the cases in the red spectral band. To do so you will have to click on the 'My models > Model Comparison' link in the left hand side navigation panel. This will bring you to the first of three pages required before ROMC will generate results graphs of the ensemble of (red spectral band) test cases that you wish to plot on one single plot:
A results page with various results graphics will be generated that now feature ONLY the ROMC submissions you selected. At the bottom of the results page in the 'All Experiments' row will be graphs that you are interested in. All graphs can be received in postscript form by selecting the graphs of interst and clicking on the 'send' button at the bottom of the page. Note that the above 'My models > Model Comparison' link will also allow you to plot several of your ROMC submissions against each other.
All radiation transfer simulations are carried out with respect to a (typically horizontal) reference plane. Only those portions of the incoming and exiting radiation that pass through this reference plane are to be considered in the various ROMC measurements.
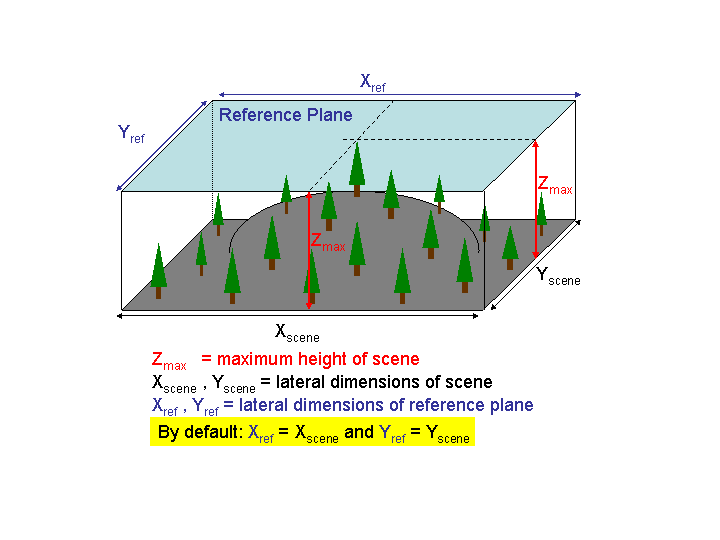
The default reference plane within ROMC covers the entire test case area (known as the "scene") and is located at the top-of-the-canopy height, that is, just above the highest structural element in the scene. The spatial extend of the reference plane can be envisaged as the (idealized) boundaries of the IFOV of a perfect sensor looking at a 'flat' surface located at the height level of the reference plane. Changing the height, location and extend of this reference area will obviously affect your simulation results.
Once you submit your correctly named and formatted results to the ROMC they will be processes and published. There is nothing that you can do to stop or reverse this process. Nothing prevents you, however, to perform another test with your model. In DEBUG mode you will be able to select exactly the same experiments and measurements, whereas in VALIDATE mode, you will - unfortunately - be given slightly different experiments and/or measurements. If you feel that you can prove that you made a mistake, e.g., misnamed the collided as uncollided etc., please contact ec(dash)romc(dash)webadmin(at)ec(dot)europa(dot)eu the ROMC coordinator who will investigate and if possible update your results pages.
Should the FAQs above not deal with your issue then contact ec(dash)romc(dash)webadmin(at)ec(dot)europa(dot)eu ROMC Team.